Introduction
For decades, scrollbars have been a critical component in the creation of user interfaces. They are designed to give users a visual cue as to how much content they can view at once, and their use dates back to the earliest days of graphical user interfaces.
Implementing a scrollbar for the first time can be more complicated than immediately apparent, as it has many moving parts that need to work together.
The goal of this article is to provide a technical and instructional guide on how to implement scrollbars in software applications, including their mechanics, design considerations, and implementation steps. By learning the fundamentals of how scrollbars work, designers can create user interfaces that are visually accessible and intuitive for all users.
This is a revised version of my original article you can find here. You can download a markdown copy of this article here.
Glossary
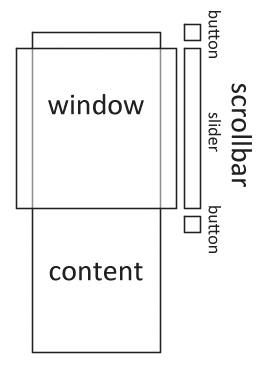
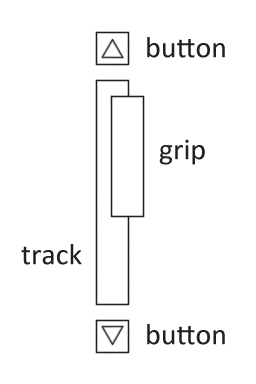
This section lists the definitions of each component of a scrollbar. Please see the included diagram for reference.
- Button: Located at the ends of a scrollbar, these are clickable components used to move the content position incrementally.
- Content: The document or other information that is being scrolled.
- Grip: The component that is dragged to move through the content and resides within the slider.
- Page: A unit of measure that denotes the maximum amount that should be scrolled at a time. Usually, this is an entire window worth.
- Scrollbar: The combination of the slider and end buttons. It is used to navigate the content.
- Slider: A combination of the track and the grip, it visually represents the proportion of content currently visible in the window.
- Track: The component in which the grip resides. The empty space helps visually convey what content the window is currently viewing.
- Unit: Represents the smallest scrollable amount, often corresponding to a line of text or a set number of pixels.
- Window: The component we can see on the GUI. This acts as a view port over the content.
Code Walkthrough
In this section, let's take a look at a basic implementation of a scrollbar. I will be providing code using basic JavaScript for the sake of clarity.
First, we define many of the general constants or variables we will be using for the rest of this tutorial. But for the purposes of this example, these are mostly constants. However, these will likely be variables instead of constants in a proper implementation.
	// Size of the content or document
	const contentSize = 400

	// Size of the window
	const windowSize = 100

	// How many units we scroll when we click a button
	const scrollUnit = 10

	// Determine how large our track is
	const trackSize = 80

	// Divide the window size by the content size to get a ratio
	// This ratio represents the proportion of content currently visible in the window
	const windowContentRatio = windowSize / contentSize

	// The position of our window in accordance to its top on the content.
	// The top of the window over the content.
	let windowPosition = 100
Next, we will write a simple function to get the actual size of the grip. This function needs to take into consideration the size of the track and the size of the content compared to the window to provide proper visual feedback, as the grip size visually indicates how much of the total content is currently visible in the window.
In addition, we also provide a minimum size for ease of use and a maximum size to prevent issues when displaying the grip.
	// The minimal size of our grip
	const minimalGripSize = 20

	// The maximum size of our grip
	const maximumGripSize = trackSize

	function getGripSize() {
		// Multiply the trackSize by the ratio to determine how large our grip will be
		let gripSize = trackSize * windowContentRatio

		// Prevent the grip from becoming too small
		if (gripSize < minimalGripSize) {
			gripSize = minimalGripSize
		}

		// Prevent the grip from becoming too large
		if (gripSize > maximumGripSize) {
			gripSize = maximumGripSize
		}

		return gripSize
	}
The position of the grip is as vital to the usefulness of a scrollbar as the size. On raster displays, it is most common for the origin of the display to be at the top left. As such, the origin of most components is also on the top left. When drawing a component manually, this location is used to position it. At this location, the actual body of the component is drawn. For the purposes of this example, this is assumed to be the case.
With this in mind, we will create a function to calculate the total distance the grip can travel within the track. As we need to draw the body of the grip, this cannot simply be the track size. The simplest solution is to simply subtract the size of the grip from the total track length, as the following function shows.
	// Calculate the size of the scrollable track area
	function getScrollableTrackSize() {
		return trackSize - getGripSize()
	}
The most comfortable experience when scrolling content is that it comes to an end at the bottom of the page. After all, it would be unusual to keep scrolling when there is no more content.
The simplest way to implement this behavior is to subtract the size of the window from the size of the content.
	// Determine the distance that the window can scroll over
	const scrollableWindowAreaSize = contentSize - windowSize
Now that we have determined the area where the grip could reside and how much of the content for the window to scroll, it is time to calculate where the grip actually is.
When determining the position of the grip on the track, we need to consider the proportional position of the window over the content. To prevent the grip from going beyond the maximum bounds of the track, we use the scrollable track size from earlier.
	// Determine the location of the grip on the track
	function getGripPosition() {
		// The ratio of the window to the scrollable area.
		const windowPositionRatio = windowPosition / scrollableWindowAreaSize

		// Determine the location by multiplying the ratio
		let gripPositionOnTrack = getScrollableTrackSize() * windowPositionRatio

		return gripPositionOnTrack
	}
To set the location of the grip, we have to do much of the same. The following function allows directly setting the absolute position of the grip. However, as a supplied value may be outside of the track, we also force it within the bounds of the scrollable track area.
	// Sets the location of the grip on the track.
	function setGripPosition(position) {
		// we do this to keep the grip from flying off from the end of the track.
		const scrollableTrackSize = getScrollableTrackSize()

		// Limit the grip so that it is not flying off the track
		if (position < 0) {
			position = 0
		}
		if (position > scrollableTrackSize) {
			position = scrollableTrackSize
		}
		// Much like the windowPositionRatio, but for the grip and track.
		const newGripPositionRatio = position / scrollableTrackSize

		// We apply this ratio in the same way as we did to determine the grips
		// location, but to the window instead.
		windowPosition = newGripPositionRatio * scrollableWindowAreaSize
	}
Directly manipulating the location of the track can be useful but is relatively uncommon. More likely, the user will drag the grip to move the window over the content.
As we can already set the grip position, dragging it becomes trivial. By calculating the delta of movement of an input, we can directly add this to the previous position. The following function does exactly this.
	// Moves the grip by the given delta. A positive delta moves forward.
	function dragGripOnTrack(gripPositionDelta) {
		// Determine the new location of the grip
		let newGripPosition = getGripPosition() + gripPositionDelta

		// Set the new position
		setGripPosition(newGripPosition)
	}
Finally, there are alternative methods of using a scrollbar other than simply dragging the grip. Most commonly, this is done by moving the window position instead of using the slider. The following function allows us to do so. This can be useful for particularly long content where the smallest movement of the slider may cause the window to skip over content.
	// Scrolls the window position by the given amount
	function scroll(distance) {
		windowPosition = windowPosition + distance
		if (windowPosition < 0) {
			windowPosition = 0
		}
		if (windowPosition > scrollableWindowAreaSize) {
			windowPosition = scrollableWindowAreaSize
		}
		// Update the scrollbar here
	}
Here are a few examples of how you could use this function.
	// Click on buttons to go back or forward
	scroll(scrollUnit)
	scroll(-scrollUnit)

	// Click on the track above or below the grip to skip pages
	scroll(windowSize)
	scroll(-windowSize)
Other possible uses for this function might be a scroll wheel or dial.
Considerations and Pitfalls
- Size and Position: Ensuring that the grip remains a useful size and remains on the track provides a comfortable and useful interactive experience for the end user. These calculations, while simple, are critical and are the most commonly misimplemented.
- User input: Consider all the diverse ways your users may interact with your content and your interface. From mouse clicks to joysticks, ensuring that the interactions are intuitive is important for a good experience.
- Ease of Use: While scrollbars are often overlooked with so many modern methods of input, a functional and accessible slider is important for those less comfortable with or unknowledgeable about them.
Conclusion
Scrollbars are more than a simple navigational tool on modern user interfaces. Instead, they are an essential part of a good user experience. Regardless of your platform or target audience, a well-implemented scrollbar will enhance the user's experience. After all, the best scrollbars are the ones that no user ever thinks about.